How to Change Your Globe At Home WiFi Password: Step-by-Step Instructions

Securing your Globe At Home Prepaid WiFi by updating its password is essential for maintaining privacy, preventing unauthorized access, and ensuring optimal network performance. By logging into your modem’s interface via 192.168.254.254, you can easily set a strong, personalized password without needing technical expertise. Regular updates protect your connection from bandwidth theft and ensure a safer online experience.
Whether you’re streaming, working, or attending virtual classes, a secure network is key to enjoying faster and more reliable internet. Take a few minutes to update your Globe At Home WiFi password today and provide your household with the seamless connectivity it deserves.
Step-by-Step Guide on How to Change Your Globe At Home WiFi Password
Table of Contents
Updating your Home WiFi password is an essential step to enhance your network’s security and performance. Follow this simple step-by-step guide to change your password with ease, ensuring a safer and more reliable internet experience for your household.
Log In to Your Globe At Home Router
Follow these simple steps to access your Globe At Home router settings and manage your WiFi network securely:
- Connect to Your Globe WiFi Network
- Ensure your device is connected to the Globe WiFi network. You won’t be able to log in if you’re not connected.
- Open a Web Browser
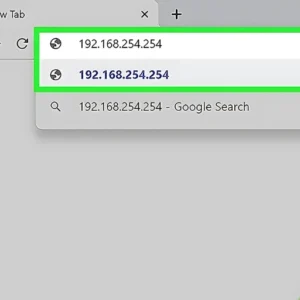
- Open a browser on your device and type 192.168.254.254 into the address bar, just as you would type a website URL.

- Enter Your Login Credentials
- Use the default username and password found on the label at the bottom of your Globe device. If you’ve previously updated these credentials, use the updated details instead.
Adjust Your WiFi Settings
- Access the WiFi Settings Tab
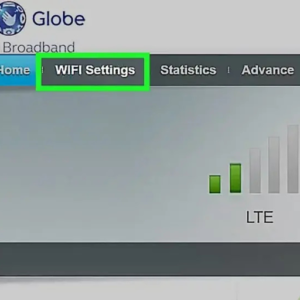
- Once logged in to your Globe At Home router’s dashboard, locate and click on the WiFi Settings tab. You’ll find this in the menu at the top of the page, alongside options like Home and Advanced.

- Access the WiFi Settings Tab
- Once logged in to your Globe At Home router’s dashboard, locate and click on the WiFi Settings tab. You’ll find this in the menu at the top of the page, alongside options like Home and Advanced.
- For Mobile Devices
- If you’re using a smartphone, tap the gear icon in the dashboard. Then, select WLAN or WiFi from the menu to access your wireless settings.
Update Your WiFi Password and Network Name
- Change the Password
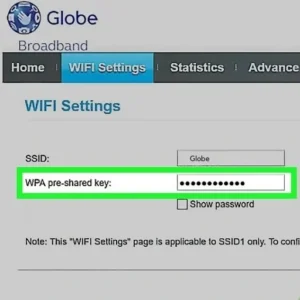
- Locate the WPA Pre-Shared Key box in the WiFi settings. Enter your desired password in this field. For accuracy, click the Show Password checkbox to view your input as you type.
- Modify the Network Name (SSID)
- To change your WiFi network name, edit the text in the SSID box. Customize it to something unique and easily recognizable for your household.

Save Settings
- Tap Apply or Save
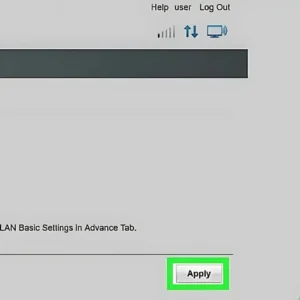
- After entering your new password or SSID, look for the Apply or Save button at the bottom of the page. Tap it to confirm and save your changes.
- Reconnect Your Devices
- If you’ve changed your password or network name, reconnect all your devices using the updated credentials.

Master Basic WiFi Troubleshooting with Globe At Home
Boost your home internet experience with Globe At Home’s simple WiFi troubleshooting tips. If you’re dealing with slow speeds or connectivity issues, these easy steps empower you to take control and resolve common problems. Say goodbye to disruptions and hello to smooth, seamless online browsing with Globe At Home!
Step 1: Check Your Modem Lights
Your modem lights provide vital clues about its status. A red LOS light (third indicator) signals no connection, while a blinking green PON light indicates a connectivity issue. Inspecting these indicators is the first step in identifying and resolving potential modem problems.
Step 2: Restart Your Modem
Sometimes, a simple restart can resolve connectivity issues. Turn off your modem, wait for 30 seconds to allow it to fully reset, and then power it back on. This quick fix often refreshes your connection and resolves minor problems effectively.
Step 3: Inspect Your Wires and Cables
Check all cables connected to your modem for any loose connections or visible damage. Loose or faulty wiring can disrupt your internet connection. Ensuring everything is securely plugged in and intact can often prevent or resolve connectivity issues.
Step 4: Check Your Connection – 2.4 GHz vs. 5 GHz
Your modem supports both 2.4GHz and 5GHz WiFi bands, each suited for different needs. Use the 5GHz band for faster speeds when close to the modem, and switch to the 2.4GHz band for better stability and extended range when farther away. Selecting the right band can significantly enhance your connection quality.
Step 5: Watch Out for Outages
Connectivity issues can sometimes stem from external factors like fiber cuts, signal interference, or local outages. Keep an eye on red lights on your modem, signaling a problem. For updates, use the GlobeOne app to check for advisories or report issues via the HELP section, ensuring a quick resolution to stay connected.
Step 6: Manage Your Devices
Ensure you’re not overloading your WiFi network by connecting too many devices, especially when multiple users are streaming, gaming, or working online. If you frequently experience slow speeds, consider upgrading your plan to support higher demand. Reducing unnecessary connections and removing browser plug-ins can also improve performance, helping your home internet run smoothly.
Step 7: Optimize WiFi Placement
The placement of your modem is key to ensuring strong signal strength. For optimal coverage, position your modem centrally in your home, avoiding obstructions like thick walls. Also, be aware of devices like microwaves or cordless phones that may cause interference with your 2.4 GHz signal. Proper placement can greatly enhance your internet performance and reduce connection issues.
Step 8: Check for Unauthorized Devices
Ensure your internet speed and bandwidth are not compromised by unauthorized devices connecting to your WiFi. Regularly monitor your connected devices and remove any unfamiliar ones. Proactive maintenance and device management will keep your connection secure and efficient. As Abigail Cardino, VP of Globe Broadband Business, says, “Your home internet is the heartbeat of your digital life.” Stay in control of your home internet experience by making these simple adjustments, and refer to the GlobeOne app for further assistance.
Contact Globe At Home or Router Provider
If you’re still encountering issues after following all the troubleshooting steps, don’t hesitate to contact Globe At Home or your router provider. Provide specific details about the problem, including any error messages or unusual behavior you’re experiencing. Their support team can guide you through additional steps to resolve the issue or offer more in-depth solutions. Taking the time to address connectivity problems early ensures a seamless and secure internet experience for everyone in your home. Solving these issues will keep your connection running smoothly and protect your network from unauthorized access.
Having Trouble with Your Home Prepaid WiFi?
Register Your Globe SIM
Activate & Register Globe Sim to avoid Scams & SIM deactivation.
Take Care of Your Home Prepaid WiFi
Learn How to Reset and Troubleshoot Your WiFi for Optimal Performance
Final Comments
In conclusion, troubleshooting your Globe At Home WiFi doesn’t have to be complicated. By following these simple steps, you can identify and resolve common issues to enjoy a more secure and seamless internet experience. Whether it’s restarting your modem, checking for unauthorized devices, or adjusting your WiFi placement, taking proactive measures ensures optimal performance. If problems persist, don’t hesitate to reach out to Globe At Home or your router provider for further assistance. Stay connected and enjoy the full potential of your internet connection!
